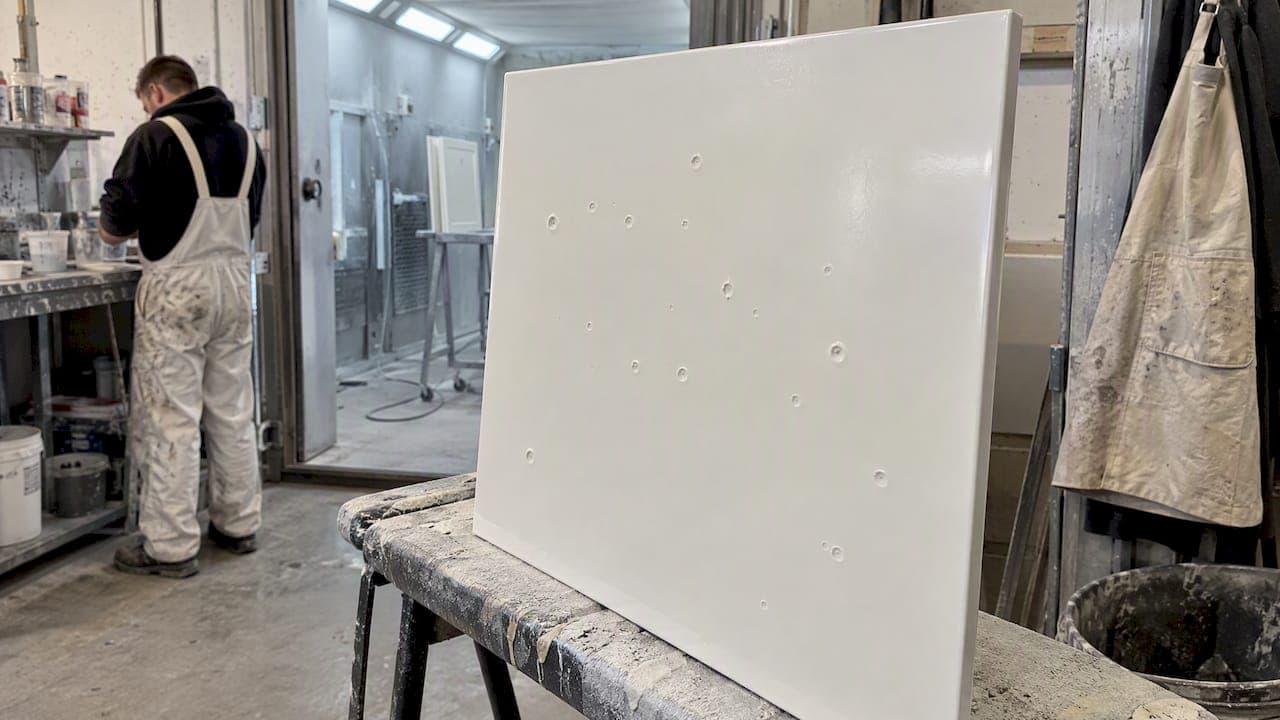
Silicone contamination causes two distinct failures: fisheyes and craters in sprayed paint, and insulating deposits on electrical contacts that cause intermittent or total switching failure. The single most important control for both is prevention, keeping film-forming sprays, polishes and silicone products away from spraying areas, and using the correct booth, filtration and respiratory protection. Quick diagnosis once contamination appears limits rework and cost.
TL;DR:
- Silicone contamination can drift from sprays, gloves, or polishes, affecting paint adhesion and causing fisheyes or craters if not properly controlled.
- Early detection through wipe tests and inspection of equipment and materials helps prevent ongoing defects and costs.
- Using dedicated filters, proper booth ventilation, and banning silicone products near spraying areas significantly reduces contamination risks.
- Repairing heavy contamination may require thorough cleaning, sanding, or panel stripping, especially for porous surfaces or persistent electrical contact issues.
- Administrative controls like logs and routine filter checks, combined with staff training, are essential to maintaining contamination-free spraying environments.
Table of Contents
- How silicone contamination works: surface tension and insulating deposits
- Where you see the problems: paint, trim and electrical symptoms to recognise
- How to test and isolate silicone contamination in your spray process
- Workshop and process controls that stop contamination before it starts
- How to fix affected paintwork and contaminated electrical contacts
- Respiratory and occupational risks, and required controls for safe spraying
- Field-tested checks and verification steps used by refinishing professionals
- Prevention beats cure
- How a professional respray can resolve persistent contamination or finish failure
- FAQ
- Sources
How silicone contamination works: surface tension and insulating deposits
Silicone compounds, usually polydimethylsiloxane (PDMS), spread as a very thin film with extremely low surface tension. When even a trace amount lands on a panel before or during spraying, the wet paint cannot wet the surface evenly. It pulls back from the contaminated spot, leaving a small crater with a raised rim, commonly called a fisheye, as described in PPG's refinish guidance on fisheyes.
A separate mechanism affects electrical equipment. Silicone vapour or oil drifting near switching contacts can react with the heat of arcing and deposit a glass-like layer of silicon dioxide on the contact surface. That layer insulates the contact rather than conducting, according to aerosol guidance from the global silicones industry.
Both problems share one trait: the contaminant travels further than people expect.
- A silicone spray used metres away can drift on air currents onto a panel being painted.
- Rags, gloves and compressed air lines that have touched a silicone product can transfer it to the next job.
- Polishes, antiperspirants and some lubricants carry PDMS without saying so on the label.
Where you see the problems: paint, trim and electrical symptoms to recognise
Recognising the pattern early saves time chasing the wrong cause.
- Paint defects: fisheyes, craters or small dimples appear in the wet film, sometimes exposing bare substrate at the centre.
- Adhesion failure: paint lifts or peels in patches, usually where a contaminated surface was not cleaned before spraying.
- Trim and seal issues: adhesives fail to bond, or seals swell and discolour where a silicone-based product has migrated into the joint.
- Electrical symptoms: relays or switches work intermittently, contacts feel sticky, or a circuit shows unexplained high resistance that cleaning only partly fixes.
How to test and isolate silicone contamination in your spray process
A short wipe test often confirms the culprit before you touch the spray gun again. Wipe a suspect panel with a clean cloth dampened in a silicone-specific wax and grease remover, then re-wipe with a dry cloth and check for a slick residue or beading water. Fisheyes clustered near door handles, vents or recently polished trim usually point to a maintenance product rather than a fault in the paint itself.
- Check compressed-air lines, filters and water traps, since oil and silicone residues collect there and transfer straight into the spray pattern.
- Inspect rags, gloves and wipes for prior contact with polish, lubricant or release agents.
- Note whether anyone used an aerosol spray, including personal-care products, near the booth that day.
- Send a sample to a lab for analysis when repeated cleaning and respraying fail to resolve the defect.
Pro Tip: Keep a simple log of every fisheye incident with date, location and nearby activity; patterns usually reveal the source faster than solvent testing alone.
Workshop and process controls that stop contamination before it starts
Prevention delivers the biggest return of any control, because once silicone is airborne or embedded in a surface it is far harder to remove than to avoid.
- Draw up an approved-materials list for the workshop and ban film-forming sprays, silicone polishes and release agents from anywhere near spraying operations.
- Fit compressed-air lines with filtration and dryers, and check them on a maintenance schedule rather than only when a defect appears.
- Use dedicated maintenance zones, separate from spraying areas, for any lubrication or polishing work.
- Issue single-use cloths and gloves for spray prep, and keep a separate, clearly labelled set for maintenance tasks.
Booth controls matter as much as material choices. HSE guidance on isocyanate paint spraying sets out the core requirements:
- Run the booth at negative pressure so contaminated air is drawn away from the operator and the workpiece.
- Measure and post the clearance time on the booth door so nobody re-enters too early.
- Replace filters on a fixed schedule rather than waiting for visible clogging.
- Where no silicone-free alternative exists, choose non-film-forming lubricants and silicone-free polishes for any nearby maintenance work.
How to fix affected paintwork and contaminated electrical contacts
Remediation depends on how deep the contamination sits.
- For light, isolated fisheyes, a fisheye eliminator additive mixed into the next coat can sometimes flow over the defect and level it, according to PPG's fisheye guidance.
- For heavier contamination, clean the surface thoroughly with a silicone-specific degreaser, sand back to sound film, and respray.
- Where contamination has soaked into porous filler or previous coats, strip the panel back to bare substrate and start again rather than risk the defect returning through the new finish.
- For electrical contacts, use a dedicated contact cleaner rather than a general solvent, then inspect for pitting or arcing damage.
- Replace the component when deposits have already altered the contact surface, since research on relay contact failure notes that arcing-altered surfaces rarely recover with cleaning alone.
Pro Tip: Photograph and date every defect before remediation; a simple record helps identify repeat causes and supports any warranty claim.
Respiratory and occupational risks, and required controls for safe spraying
Spraying isocyanate paints and aerosolised film-formers carries a real inhalation risk, not just a cosmetic one. Peer-reviewed toxicology on a nanofilm spray product found that it interacted with pulmonary surfactant and reduced expiratory flow in animal models, as reported in a study on lung damage from film-forming sprays. That mechanism shows why even consumer-grade aerosols deserve caution in enclosed spaces, not only industrial isocyanate products.
HSE's guidance on spray booths and rooms sets the baseline controls:
- Wear air-fed breathing apparatus while spraying and throughout the measured clearance time, not just during the spray pass.
- Never raise a visor or leave the booth early, even when the air looks clear.
- Confirm clearance time with a smoke or fog test rather than guessing from memory.
- Keep maintenance and testing records for the booth, including filter changes and pressure checks.
Our overspray prevention guidance covers simple checks suited to home workshops and small operations.
Field-tested checks and verification steps used by refinishing professionals
On site, we protect hardware, trickle vents and seals before any spraying begins, using masking methods detailed in our guide to protecting trickle vents, then verify the finish once it has fully cured rather than while it is still soft. Our hand-spray technique, carried out by the same team that quotes and preps each job, reduces the handoffs where contamination typically creeps in. That consistency matters most on jobs where a single missed wipe-down can mean sanding back an entire panel.

Prevention beats cure
The workshops with the fewest contamination problems are not the ones with the best solvents. They are the ones with the plainest habits: a banned-products list, a logbook, and someone who checks the compressed-air filter before it becomes a crisis.
— Mitchell
How a professional respray can resolve persistent contamination or finish failure
When fisheyes, peeling or discolouration keep returning despite careful cleaning, incremental DIY fixes often just mask the problem until the next coat fails too. We offer hand-spray respraying of UPVC windows, doors, fascias and kitchen cabinetry, applying factory-standard finishes with a warranty and no subcontractors on any job.

For UPVC, our window spraying service and door spraying service start from a full strip-back and clean before any new coating goes on, which removes the contamination risk that caused the original failure. For kitchens affected by stubborn surface defects, our kitchen respraying service covers cabinets, doors and drawer fronts with the same hand-finished approach. Get in touch for an inspection and a quote if repeated touch-ups have stopped holding.
This article is general information, not a substitute for advice from a qualified doctor. Consult a qualified healthcare professional about your own circumstances before acting on anything here.

FAQ
Should you spray silicone sealant?
Silicone sealant itself is usually applied by gun rather than sprayed, and keeping any silicone product away from areas where paint will be sprayed is the safer practice. Mixing silicone sealant work with nearby spraying operations raises the risk of fisheyes and craters in the paint film.
What to spray when applying silicone?
Silicone sealant does not need a spray coating; it cures on its own once applied and tooled. If you are asking about release or lubricant sprays near a silicone joint, choose a non-film-forming, silicone-free product to avoid cross-contamination of nearby painted surfaces.
Can you spray over silicone?
Paint generally will not adhere properly over cured silicone residue, since the low surface tension causes the paint to pull back into fisheyes, as outlined in PPG's guidance on fisheyes. The residue needs thorough cleaning with a silicone-specific degreaser, and sometimes sanding back to sound material, before a new coating will bond reliably.
Why should you avoid silicone?
Silicone residue disrupts paint adhesion, causing fisheyes and craters, and silicone vapour can deposit an insulating film on electrical contacts that causes intermittent or total failure, according to industry aerosol guidance. Both problems are easier to prevent than to fix once the contamination has set in.
How do you know if silicone caused a paint defect?
A wipe test with a silicone-specific wax and grease remover, followed by checking for slick residue or beading, often confirms the cause. Clustering of fisheyes near recently polished trim, door handles or vents is a strong indicator that a nearby product is the source.
Sources
- Mechanism of action of lung damage caused by a nanofilm spray product (PubMed Central)
- Aerosol guidance document (global silicones industry guidance)
- Safety in isocyanate paint spraying INDG388(rev2)
- Fisheyes (PPG refinish guidance)